Showing posts with label DIY. Show all posts

Wednesday, September 3, 2014

Hello My Name Is....INTRO FUN!!

School is back in session and I've been busy reading IEPs, making schedules, checking in on my previous students and meeting my new ones!  I found these fun "Hello my name is..." stickers in the dollar store and knew I had to use them!
My students had to come up with an adjective that started with the same letter as their name.  They got to write it on their sticker.  They then got to place the sticker on their speech folders!!  They had so much fun trying to come up with creative answers.  I even let them go to thesaurus.com to find some fun synonyms!  

Some examples of what they came up with:

  • Awesome Ashley
  • Daring Derrick
  • Neat Nathaniel
  • Entertaining Edwin
We had a blast!!

Monday, September 1, 2014

How Do You Use It?! September: Brown Paper Bags

It is that time again...how do you use it?!  

This month: brown paper bags!  I buy a pack cheap at any supermarket or Target and they usually last me the entire school year.
One of my favorite ways of using these are for creating "paper bag books."  You can see my previous post when I described how I made them by clicking HERE!

Another favorite way of using paper bags are for sorting activities.  Just grab some bags, write on the outside and take sorting pictures!  I have used them with fishing activities by Super Duper Inc. as well!  See below, we fished for common objects then sorted by category.  I even wrote a sentence strip on each bag to promote expanded utterance length!
Another way to use paper bags are for eliciting stories.  Throw pictures of random objects or small objects themselves into the bags.  Then, students can take turns picking out a picture/object and telling a story with a beginning, middle, and end using that object.  Want to make it more challenging?  You can have them incorporate articulation targets, learned prepositions/curriculum vocabulary/question words/pronouns/any other target you are currently working on!

Stay tuned to next month!

Wondering how other SLPs/bloggers use brown paper bags?!  See below - they linked in!


Monday, July 14, 2014

Organization Fun!

Organization fun --- is that even possible!?  Well...every summer, I am always looking up ideas and trying to come up with new ways to be organized in the upcoming school year.  I try my best throughout the year to keep organized.  I will say, when I am organized, I definitely do a better job!  I remember to complete all tasks before upcoming meetings, paperwork is up to date and completed, and reports are written in a timely manner.  

This week, I am joining in a new linky with Busy Bee Speech.  Check out her blog to see how she and other bloggers stay organized!!

How do I stay organized?!  I use a data binder to keep everything in one place.  I use a binder with a clear insert on the cover.  In here, I put my schedule.  In this binder, I have tabs for each student.  For each student, I have an IEP cheat sheet, parent communication log, IEP goals printed out, an attendance form, and a data log for progress monitoring.  Check out my previous blog post about this binder by clicking HERE!
You can grab a FREE copy of my data collection form in my TpT store by clicking HERE!
What are my organization goals for next school year?

  • Clean up my drawers filled with lesson materials so I can find things easily and quickly.
  • Keep frequently used graphic organizers/worksheets in a nearby spot so I can easily grab them at any point.  I found these great magnetic holders that I can use!  Click HERE to see them for yourself!
  • Not forget about some great materials and products that I have!!  Things get hidden or pushed into the back of cabinets and I forget about them!  Boo!  So not fun!
  • Put things away right after I use them!  I hate the piles and clutter!
  • Remember to look at my calendar and planner!
Have you seen my other previous posts on organization??  

Tuesday, July 1, 2014

How Do You Use It?! July: Post-Its! (Linky party!)

It's that time again...time to find out how I (and other SLPs/educators) use common items found in classrooms/therapy rooms!!  I know it is summer but some work summer school, and others just  have fun browsing Pinterest/blogs to get ideas for next school year.  Either way, enjoy!!
This months topic: POST-ITS!!  I LOOOOVE post-its!!  Whether it is to just quickly put a memo, reminder and even use them during speech sessions!!
Here are some ways I have used Post-Its in my therapy room...

Note-Taking:
By cutting post-its into smaller pieces (or purchase them already like that), you can easily make a quick note-taking strategy for students while reading texts.  I like to have students stop after reading/listening to a paragraph at a time.  I check for understanding by asking "what was it all about?" My students know by now that I am looking for the main idea.  Then, they can write the main ideas on their post-its and stick it to the side of the page/paper.  They can easily remove all of their post-its after to help write a summary or use them to locate answers to comprehension questions without having to re-read the entire text!  They love this strategy!

Visuals:
I always have a stack of index cards and post-its near my therapy table.  It is a great way to easily create a visual when necessary.  What would make me pick the post-it over the index card?!  I can easily stick it to a page or table!  This is great for students that want to move it out of the way! Ha!  Check out below some samples of how I've used this:


I recently blogged about how I used these fun Mustache Post-its that I found at Staples.  Click HERE to learn more about it!


How do you use Post-its?!  Do you use them in therapy or more for organizational purposes?!  Check out below how other SLP/bloggers use post-its!!  Also, stay tuned to next months topic!  Gather up your ideas to use for next school year!!


Thursday, June 12, 2014

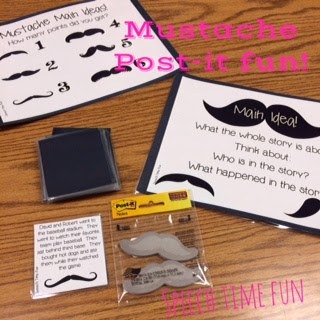
Fun Finds: Mustache Post-Its! (and how I used it in speech therapy!)

I am always browsing Staples, Target, and Dollar Stores for fun therapy finds.  This week, I was in Staples, and I found these adorable Mustache Post-Its!  Students are LOVING mustaches these days so I knew I had to grab them!

I knew right away how I could use them!  I have a Mustache Main Idea activity!  I usually make students verbally express the main ideas while they read or listen to each passage on the cards.  I decided to change it up!  Depending on the group/goal in mind, I used the post-its in the following ways:

  • Some students got to write the main ideas on the post-its to get practice with written expression.
  • I wrote "main idea" and "not the main idea" on the post-its and students got to stick them onto the cards as I expressed various correct and incorrect answers.
  • We used the post-its as a follow-up activity with a full page story.  Students wrote the main ideas on the post-its after each paragraph read to help with note-taking.  Then they transferred these main ideas onto a graphic organizer and created their own test questions using their main idea mustache post-its.  Learn more about this strategy by visiting a previous blog post by clicking HERE!
  • Instead of raising their hands, they got to put the mustache on their face!  How fun?!
We had so much fun this week playing with mustaches and reviewing main ideas because of this awesome Staples find!  How can you use these post-its?!

Monday, June 9, 2014

EET Carryover Ideas!!

Have you joined in the EET party?!  No...it is not a real party!  But it is just that much fun to use in speech therapy!  CLICK HERE to learn more about the Expanding Expression Tool!  I have been working hard all year with my students to expand their abilities to describe common objects, compare/contrast, and even describe/compare using non-fiction texts.  Now, it is time to come up with ways for them to carryover the skill into the classroom!
I created these fun EET rings with my students.  I cut index cards in half, put each EET bead on a card, hole punched, and put them on binder rings.  Now my students can easily bring these with them back to the classroom (since I do not have enough student EET strands!  I only purchased 5 for the max amount of students I would have in my therapy room).  

Before I allowed my students to bring them to their classrooms, we practiced using them in academic tasks!  
  • Academic vocabulary:  I pulled vocabulary words from their science and social studies curriculum.  I also pulled words from novels they are reading in their ELA classes.  We practiced defining these words and concepts using the EET rings!  Vocabulary examples:  biomes, solar system, government, and Greek mythology.  I showed them how they can use the EET to study, complete study guides/worksheets that require expanded written responses, and identify which words are being described to select the answers!
  • Listening/reading for keywords:  We practiced reading/listening to texts and listening for the EET concepts.  I gave the students a graphic organizer to complete but they had to flip to the EET "bead" on their rings when we got to a concept in the text that would answer that "question."  This helped them focus their listening/reading to the important facts!  We then practiced retelling the texts using the EET rings to make sure they expressed each important fact!
My students loved creating these rings and practicing them.  A few of them have already told me that they are using them in the classroom or with homework!  I have also held workshops in my school to educate the teachers on what these rings are and how they can help their students.  This way no teachers are confused and try to take them away thinking the students are being distracted!

How do you work on carryover?!  Have you missed some of my other blog posts on how I use EET?  Check them out below!

Monday, May 12, 2014

Foldable Sentences! (DIY Idea!)

Are you looking for a fun way to work on sentence structure!?  I love using foldables in my speech room.  All you need is a piece of paper, pen/pencil/crayons/markers, and scissors!  That is it!  Who doesn't have those materials readily available?!  Students can also work on following directions while creating these activities!


I decided to create a foldable to work on sentence structure!  You can easily work on any sentence structure goal with this!  I have many students working on combining sentences and using conjunctions so, above you will see what we did!  That is the foldable open (only because it was hard to take a picture folded, it wouldn't stay flat!).  As you can see, we folded the paper in half (I did it the long way to make more/longer pieces).  Then we cut the paper twice to make 3 pieces.  As you can hopefully see, the middle piece is the smallest.  I like to have my students use the top side as an illustration.  Then when you lift each flap, students can write the parts of the sentence that correlate to the illustration underneath.
Now, you are probably wondering, ok great how did she teach them how to do this on their own?!  Good question!!  We have done a lot of practicing first on using each specific conjunction at a time and identifying when to use each one.  We made this one foldable after drilling TONS of "and" sentences.  I taught them that when you are adding or combining (hence the + sign on the front of the foldable), then you use the word "and."  I took pictures or short passages (depending on the students levels) and had students describe them to answer questions.  "What was the family doing?"  "What does the boy have?"  Then the students used their foldables to answer my questions using their compound sentences!  My students had so much fun illustrating their foldables!

Do you use foldables in your therapy room?  How do you use them?  How do you work on sentence structure, combining sentences, or teaching conjunctions?!

Wednesday, April 9, 2014

Easter EET Fun! (fun ways to incorporate the EET during Easter time!)

Are you looking for more ways to incorporate the EET into your therapy rooms during Easter time?!  I have some activities that I have been doing to help you out!!  Don't have an EET kit?!  Learn more about it by clicking HERE!
What did I use?!

  • The EET strand
  • Object cards from the EET kit
  • EET dice from the EET kit
  • EET stickers from the EET kit
  • A fun, spring basket/bin that I got from the Target dollar spot
  • Graphic organizer from my activity pack found HERE!
  • Index cards or small pieces of paper
  • Easter eggs that I got from a dollar store
Pick an EET Egg:
  • I put an EET sticker on small pieces of paper and placed them in the Easter Eggs.  I put the eggs in the buckets and gave one to each student.  Only one basket?  You can place them all in a basket and pass the basket around.  (my students have a tendency to "cheat" so I presort to avoid it!)
  • Students picked a card from the object card and an Easter egg.  They had to open the egg to find out how they had to describe the object on the card!!

EET Dice Fun:
  • Students can pick an object card and roll the dice to find out how they need to describe it.
  • Once they respond accurately, they can hunt for an Easter egg around the therapy room!  
  • Some groups I put in little prizes such as erasers in the eggs.  Other groups, I put in pieces of paper with multi-step directions to follow (to work on other skills for groups with multiple goals).
  • This was so much fun and students loved moving around the room!
Graphic Organizer Fun:
  • We used these graphic organizers as a review
  • Students got to pick a card from the object cards pile
  • They had to independently use the EET to describe it
  • It was a great way to collect data!

Looking for other ways to use the EET during Easter time?  Have you seen my Easter EET Companion pack?!  How do you use the EET during Easter?!  Hope these ideas can help you plan the next few days/week!

Saturday, March 1, 2014

How Do You Use It?! March: Dry Erase (Linky Party)

It is that time again!!!  Another "how do you use it?!" linky party post!!  If you didn't know from last month, once a month, I will be posting with ideas on how to use a product that is already in most speech rooms (and if not, easy to find!).  I will also have other SLP bloggers linking up their posts on the same topic that I have provided!  Their posts can be found on the bottom of this post!
This month's topic: DRY ERASE!!!  Who doesn't love dry erase?!  I have TONS of markers in my speech room!  It is such an easy way to motivate students to write!  Even though they are writing, they prefer using these over pencils, so why not use them!!  I have compiled a list of some of my favorite ways to use them!
Making Cards Interactive:
Just by laminating, anything can be made interactive with a dry erase marker!!  I took my sequencing activity from my Baking Up Good Speech: Receptive Language activity pack, laminated it, and grabbed my dry erase markers!  Students were able to number the sentences in the correct sequence!  Then I was able to erase it and use it with another group!!  Another idea?  Teaching context clues or vocabulary, students can underline the unknown words or clues in sentences with dry erase markers!!

Dry Erase Pockets:
Have you seen these pockets?  I know some have found them in dollar stores or at Target in the dollar section.  I got mine from Lakeshore Learning.  But you can also find them on Amazon.
I use these pockets to make writing fun without laminating!!  It is also a great tool if photocopy machines are broken!  Just slip a worksheet in, and now it is dry erase!  You can use the same worksheet with multiple students/groups!!
Above you can see how I used the dry erase pockets to complete the sequencing graphic organizer with my Sequencing For Older Students pack!

Making File Folders Interactive:
Just like my idea with the cards, I like to laminate file folders and use dry erase makers with them!  

See above, I used my Superhero Story Recall activity.  My students listened as I read one of the stories and completed the graphic organizer on the file folder with a dry erase marker.  Then, we were able to play the game on the file folder.  My students were able to easily refer back to the graphic organizer when needed to answer questions!  I love file folders for activities like this because it keeps things together and students can easily visually see that they can use their notes.  By making it dry erase, I was able to erase it and reuse with another group later that day easily!!

Dry Erase Sentence Strips:
If you follow my blog, you will know I absolutely LOVE sentence strips.  I like to give students carrier phrases as visuals and cloze sentences to expand utterances.  I found these amazing sentence strip dry erase boards in Target in the dollar spot section.  I found them so long ago but I did find them on Amazon as well.


These are great for creating easy visuals (instead of index cards or post-it notes).  But you can also use them to have students write one word answers!  I find when I want a one word answer and I give them large dry erase boards, they are easily distracted and will doodle!  This helps keep their attention focused on the task.  When might I want a one word answer?

  • Word retrieval tasks: completing cloze sentences
  • Grammar activities: you give the students a verb or noun tense and they need to write it
  • Guess the vocabulary word when given a definition.
  • and so much more!
See below my example of a word retrieval activity using my Ipod Auditory Closure activity.
What Would They Say?
I found these amazing speech bubble images that are suppose to be for a bulletin board.  I laminated a few of them so they can be used with dry erase markers!  When working with social skills groups, fluency, articulation, or even syntax goals, I will give students scenarios and they can complete the speech bubbles with their responses!
Below are similar products I have found on Amazon:


How do you use dry erase?!  I hope you find these ideas helpful and fun!!  Stay tuned to next month's linky party topic: Popsicle sticks!
Disclaimer: this post contains Amazon Affiliate links.

Want to see what your other SLP bloggers do with dry erase in their therapy rooms?!  Check it out by clicking their links below:

Wednesday, February 12, 2014

Nonfiction Comprehension Fun!!

I am always looking for better ways to work on nonfiction comprehension with my older students.  The teachers are always complaining that the students aren't carryover the skills into their classrooms.  But if you can tell my style by now, I don't like to do things traditionally!
I will show you how I took one motivating nonfiction story and targeted multiple goals over several sessions!

Have you heard of the book, "Hi-Lo Nonfiction Passages for Struggling Readers: Grades 4–5: 80 High-Interest/Low-Readability Passages With Comprehension Questions and Mini-Lessons for Teaching Key Reading Strategies?"  I definitely recommend it for those working in a public school with school aged students.


I found this great story on the  history of video games!!  Hi, motivation!!  Even the title of the story targeted goals: past and present!  We started off using this story by comparing/contrasting past and present, using the different verb tenses (2 goals right there!!).  We generated a list on my dry erase board with what my students thought video games were like in the past.  They got to predict what they would learn in the story.  We left this list up as we read the story.  They got a kick out of who was closest to the truth and who was very far off (I threw in some silly responses just to make them think and laugh like "I think only 6 feet tall men could play video games").  

I have many students working on expressing main ideas, recalling details, and using note-taking techniques/graphic organizers to organize thoughts/help recall/express summaries/etc.  I took some post-it notes and cut them up into strips.  I placed the pile of post-it strips in the middle of my therapy table.  As we read the story, we stopped after each paragraph and my students had to generate a main idea of the paragraph read.  We used my strategy "what was it mainly about and what happened to it?"  This helped guide them to narrow down all of those details into ONE sentence!!  We wrote these sentences on the post-its and they stuck them onto their papers next to the paragraph it went with.
Once we were done reading and writing/expressing main ideas, my students had fun verbally telling summaries using their "notes," expressing sequences, and answering recall questions.  They loved that their post-its helped them locate the answers in paragraphs they couldn't automatically recall on their own.  It definitely reduced the "I don't knows" and "I can't find its."  My students even got a chance to come up with their own comprehension questions and challenge each other!!

We then used my dry erase board and completed a Venn diagram to compare video games from the past to today.  My students did great pulling out the details from their story and using their own knowledge of video games!  They felt so successful!!  We also had discussions about what we think will happen to video games in the future!  Some got to draw and write about it too!  It was a great way to work on descriptive writing and using future tense verbs!

The stories in this book come with comprehension/vocabulary/grammar questions.  But who wants to answer questions with boring pencils?!  I took out my fun Crayola Stamper markers and let them stamp the answers!!!  So much more fun and motivating!!!  They didn't mind doing boring worksheets!


Since I used this story over several sessions and we read this story over and over and reviewed our post-it notes over and over, we focused on a different comprehension skill each day.  One day we worked on answering higher level thinking questions.  Students knew they had to use their notes and their own knowledge to generate answers, they couldn't just look back to find it!  Another day, we worked on using context clues to generate word meanings.  We looked at what the paragraph was about, what we knew about the topic, looked for clue words before and after the unknown word, and substituted all of the multiple choice answers into the sentence to see which makes the most sense!  My students did great using their strategies!!  

So, let's recap, how many goals did I target with this activity?

  • Past, present, future tense verbs
  • Sequencing
  • Main idea
  • Recalling details
  • Inferencing
  • Compare/contrast
  • Predicting
  • Descriptive writing
  • Generating questions
  • Context clues
  • Expressing summaries
  • Note-taking
  • Conversational skills
WOAH!!! Now that is a lot!!  I am a huge fan of this book and recommend it!  I also recommend some of these strategies to target these common core skills that correlate to speech and language goals!  I hope you can use some of these ideas if not ALL in your therapy rooms!!

Disclaimer: This post contains Amazon Affiliate links.

Monday, February 10, 2014

DIY Speech Tic-Tac-Toe

Do you ever have those moments at the end of a session that need to be filled?!  A lesson goes faster than expected?!  I tackled this problem by flipping over the piece of paper that we were using in the plan's activity, drew a tic-tac-toe board, and DONE!
I used pencil to make the board and write synonyms in each spot (that's what we were working on).  While I was busy preparing, I let my student pick 2 crayons out, 1 for me and 1 for her.  Then we played!  As we picked our "spot" we had to say the synonym for the word in the box.  As you can tell above, no one won!  But I prepared for that one!!  I didn't take up the whole paper!  I just made a new board and played again!  When we ran out of paper, we started using my dry erase board!  I let my student help me come up with words to put into the boxes too!!  She felt like a teacher's helper which she LOVED!!  Who knew that tic-tac-toe can be the answer?!

What else can you use tic-tac-toe for targeting?

  • Articulation target words
  • Antonyms
  • Multiple meaning words
  • Homophones
  • Noun or verb tenses
  • Contractions
  • Answering questions or using different question forms
  • Prepositions
  • New vocabulary from a book you just read
  • And so much more!!!  Basically, any target can be used!!
Do you use tic-tac-toe?  How have you used it?  How did your students respond?!

Friday, February 7, 2014

DIY Snowman Fun!!

Are you looking for a quick and easy idea to target TONS of language skills all in one?!?!!?  Grab a piece of paper, a marker and some crayons and you are ready to go!!
Before my students arrived, I drew the three balls of snow so it looked like a snowman on a piece of paper.  I also added the cloze sentence strip on the top.  My students still need this assistance in order to produce complete answers.

What could be addressed with this simple activity?

  • Snowman vocabulary: what parts does the snowman need?
  • Following directions: "draw a scarf on the snowman" "draw three blue buttons on the snowman" You can EASILY make the directions as simple or complex as you need!  Multiple students at different levels?  Give each one different directions, they won't even notice that some are more difficult!
  • Prepositions:  I was targeting the concept "on" with this task but you can work on any concept!!  You can have the students draw the pieces or you can do it for them..."where's the ___?"
  • Answering questions: "What goes on the head?" "Where's the hat?" "When do you build a snowman?" "Why is the snowman wearing a scarf?"
  • Describing:  students can decorate their snowman and tell you what they did using adjectives, colors, locations, parts, functions, and more!
This fun and easy activity can be used with multiple groups or groups with multiple goals!  It is cheap, quick preparation, and can be easily adapted!  How will you use this idea?!

Saturday, February 1, 2014

How Do You Use It?! February: Index Cards! (Linky Party)

The time has finally come...I am hosting my first linky party!  What is that?!  Well...I have created a theme/concept and I will have monthly themes.  Other SLP bloggers will have the opportunity to share their ideas related to my concept.  They will "link" to their blog posts at the bottom of my original blog post.  This way...you can access IT ALL from one spot!!
You seem to LOVE when I share how I use various "toolbox items" in my therapy room, DIY, and easy to implement therapy ideas.  Well..that was what inspired my linky party concept.  Each month, I will share how I use an item found in most therapy rooms and will allow other bloggers to share their ideas too!!  This month's item...INDEX CARDS!!
Are you thinking any of the following?!:

  • "Well of course everyone uses index cards!"
  • "That isn't anything new!"
  • "What new ways could there possibly be to use index cards?"
Well..I will share with you some ways that I use index cards.  You may already use some of them, maybe all of them, maybe none!  Either way..I hope to share a new idea of some sort with you!  Or it may just inspire you to use those index cards again!  

I always try to grab index cards from the dollar store or from Staples (using coupons of course!).  I always have 2 sizes: small and large.  I have bulks in white but I also sometimes grab the ones in various colors.  

Memory Matching & Go Fish Games
One way I use index cards is to make quick and easy games using any target I need!  If I am working on vocabulary, I print out two copies of that images and glue it onto index cards and students must find the match.  Once they find the match they must label the image (and if the goal fits: say category, describing feature, name object function, etc.).
As you can see above, I was working on adjectives!  Students had to find the matches of the adjective word and then tell me a noun that can be described using that adjective!  With the help of Boardmaker, anything is possible!!

Easy, Ready To Go Visuals
I am always grabbing an index card to quickly make a visual!  Whether it is for a sentence strip/carrier phrase, quick strategy, or image to represent a preposition, it is a great tool to have near your therapy table!  You never know when a student could benefit from extra supports!!
Where Is My Sound?! Articulation Or Phonological Awareness Activity!
I took each of my students' articulation targets and wrote them on clothespins.  I color coded each sound with a different marker color.  Then I wrote a variety of CVC and multi syllabic words on index cards.  I used the target in the initial, medial, and final positions.  I made a ____ where the target sound would go in the word.  I chose to use the same color marker on the clothespin on the index card to help my students (and me to grab and go!).   Students are able to practice their targets while creating words on my index cards!!  Cheap and easy therapy idea!!
You can easily use this same idea with vocabulary words.  Just write vocabulary words on a clothespin or smaller index card.  You can write cloze sentences on larger index cards.  Students can have fun inserting their vocabulary words into the sentences to demonstrate understanding on how to use the words!!

Producing Clusters Articulation Idea:
I have several students working on producing clusters.  Some have trouble producing the first sound and some with difficulties in the second.  I wanted to make an easy way to work on drilling.  I cut a square in an index card.   Then I cut a piece of construction paper the same length as that square.  I wrote one word without the difficult sound position on the index card.  Then I wrote the second sound on the construction paper.  Just by pulling the paper through, we can now work on this tricky consonant cluster!!  You can have students make their own as a following directions activity, this way they can bring them home to practice!  
Those are just several of the MANY ways I use index cards.  Are you wondering how your other favorite SLP bloggers use index cards?!  Check out their blog posts on it by clicking the buttons at the bottom of this post!!  Stay tuned to next month!  The topic will be using dry erase!!!

Friday, January 31, 2014

Cause & Effect DIY Idea!!

We have been having so much fun working on cause & effect in my therapy room!!  We have been playing games involving expressing causes if given effects and listening to passages and answering questions using cause/effect.  I have been wanting to do flip books for a while with my students.  I decided cause/effect is a great opportunity to do so!!!  Check out my example to show my students on what they were to make themselves!
How to make this?! Easy and a great way to also work on following directions!!  Fold a piece of paper in half.  Then cut the top piece down the middle!  Label 1 side "cause" and the other side "effect."  I illustrated the cause and effect on the top pieces.  Once you lift up each flap, I wrote the sentence based on the illustration.

After I showed my students mine, I gave each of them a cause written on a piece of paper.  Some examples included:

  • My pencil broke.
  • There was a snowstorm.
  • I forgot my lunch money.
  • I left my bird's cage open.
  • I was up late playing video games.
My students had to think of their effects, write both the cause and effect inside of the flip book and then illustrate both on the front.  They students got to share their responses and pictures.  We had so much fun!!

Want to see what else we have been doing in speech to work on cause and effect?!

We have been using Busy Bee Speech's Cause & Effect Carnival!
 We also used my cause & effect graphic organizers from my Winter Graphic Organizers for SLP pack!
How do you work on cause & effect?  Have you made flip books?!  How did you use them in your therapy rooms?!